Bài này tôi sẽ hướng dẫn các bạn làm cách nào để mang 1 hệ thống website từ môi trường local lên GCP sau khi release 1 version mới bằng phương pháp CI/CD pipeline thông qua jenkins.
Giả sử chúng ta đã có account login vào GCP, và tạo 1 tên project thì chúng ta mới tiếp tục demo
Để làm được chúng ta sử dụng các bước:
Login và tạo 1 project trên GCP
- Code repository: Google Cloud Source Repositories
- Continuous integration: Google Cloud Builder
- Container registry: Google Container Registry
- Orchestrator: Google Kubernetes Engine (GKE)
Chúng ta làm thứ tự từng bước như sau:
Bước 1 tạo Code repository: Google Cloud Source Repositories: để lưu source code và đồng bộ lên server
bạn vào màn hình:
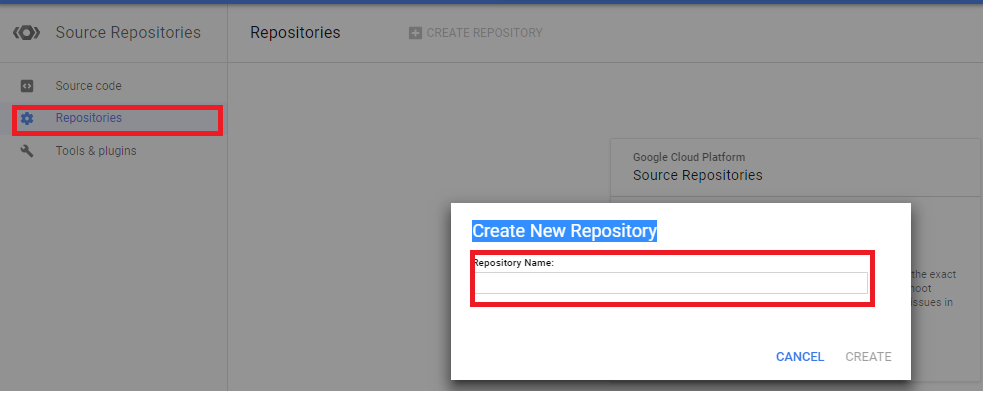
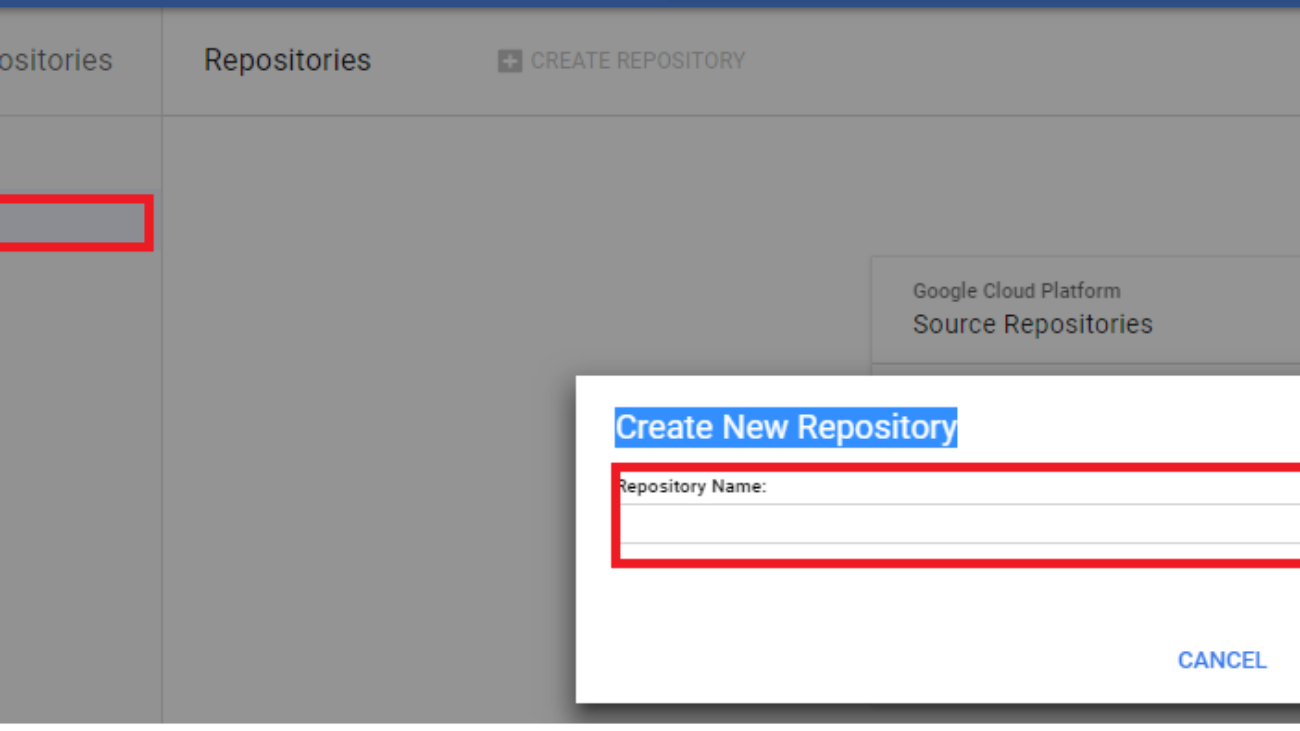
Khởi tạo 1 tên “default” rồi nhấn nút “CREATE”
đương dẫn trên git lúc này sẽ như bên dưới :
https://source.cloud.google.com/hosiana-test/default
Tiếp theo nó sẽ mở ra 1 trang cho bạn những tùy chọn như hình:
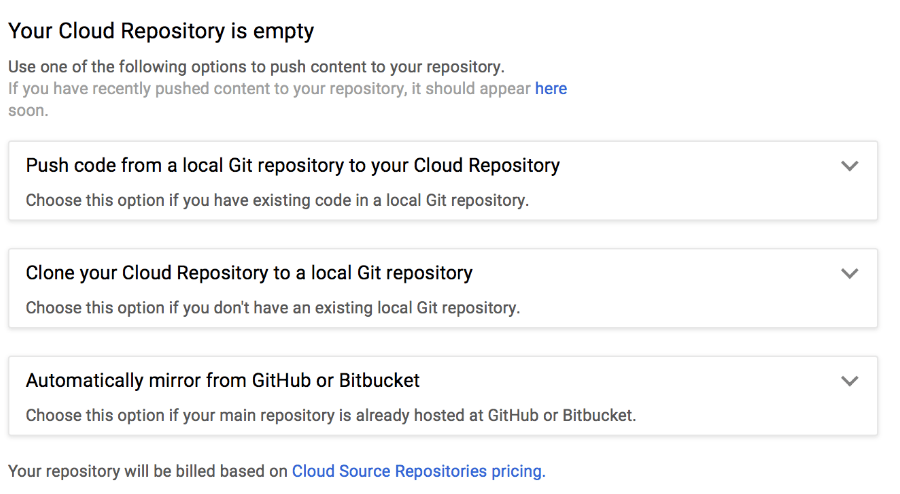
Giải thích các option như sau:
Option thứ 1 là nếu bạn có Git repository trên local rồi thì chỉ việc chọn option này để đưa code lên Cloud Reponsitory
Option thứ 2 nếu bạn chưa có 1 Git repository thì chọn option 2 để sau khi khởi tạo 1 Git repository từ Cloud Repository sẽ tạp 1 bản xuống local
Option thứ 3 là nếu bạn có source code đặ tại GitHub hay Bitbucket hosting rồi thì chọn option này để tại Cloud Reponsitory
Trong bài này mình chọn “Clone your Cloud Repository to a local Git repository” là mình chưa có Git repository trên local cần tạo 1 bản copy và đồng bộ sau khi tạo trên Cloud GCP
Tiến hành:
bạn mở Cloud Shell lên trên trình duyệt GCP góc phải trên và tiến hành:
gcloud config set compute/zone asia-southeast1-cTiếp theo bạn dùng lệnh như bên dưới để download code demo về máy:
git clone https://github.com/GoogleCloudPlatform/continuous-deployment-on-kubernetes.gitBướ tiếp bạn trỏ về thự mục chuẩn bị setup source code bên trên:
cd continuous-deployment-on-kubernetesTiếp theo tại dấu nhắc lệnh bạn gõ lệnh như bên dưới để khởi tạo git và thẩm định quyền:
git init
git config credential.helper gcloud.sh
Tiếp theo bạn remove tới GCP để thẩm định quyền và khởi tạo 1 folder Git trên local máy tính của mình như sau:
git remote add origin https://source.developers.google.com/p/hosiana-test/r/defaultTiếp theo bạn thực hiện tạo user và pass để truy xuất git trên local máy mình thay thế[EMAIL_ADDRESS] và [USERNAME] cho phù hợp trên Git local :
git config --global user.email "[EMAIL_ADDRESS]"
git config --global user.name "[USERNAME]"
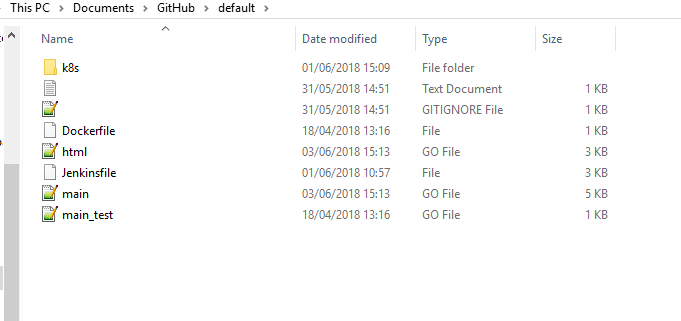
Tiếp theo hiện tại source code trên GCP có tên default là rõng, sau khi bạn download source code trên từ git trên internet bạn tiến hành copy thư mục sample_app vào trong folder default như hình sau:
Tiếp theo bạn tiến hành commit Git lện GCP source reponsitoies như sau:
git add .
git commit -m "Initial commit"
git push origin master
đến đây bạn đồng bộ source code từ loca lên Git GCP
tiếp theo bạn tiếp tục tiến hành tạo kubernetes và jenkin
Tiến hành tạo network để dùng cho kubernetes engine như lệnh sau:
gcloud compute networks create jenkins --mode autoTiếp theo bạn tiến hành khởi kubernetes engine như sau:
gcloud container clusters create jenkins-cd
--num-nodes 3
--network jenkins
--scopes "https://www.googleapis.com/auth/projecthosting,storage-rw"
Tiếp theo bạn tiến hành bạn xem lại danh sách cluster đã khởi tạo như sau:
gcloud container clusters listTiếp theo bạn tiến hành thẩm định quyền tương tác vào các Cluster để build hệ thống như sau:
gcloud container clusters get-credentials jenkins-cd Lưu ý tên Kubernetes engine phải như tên khởi tạo ở trên nhé
Tiếp theo tiến hàng kiểm tra khởi tại kubernetes engine xem ok chưa dùng lệnh như sau:
kubectl cluster-infokết quả sẽ là như sau:
result:
Kubernetes master is running at https://35.187.236.207
GLBCDefaultBackend is running at https://35.187.236.207/api/v1/namespaces/kube-system/services/default-http-backend:http/proxy
Heapster is running at https://35.187.236.207/api/v1/namespaces/kube-system/services/heapster/proxy
KubeDNS is running at https://35.187.236.207/api/v1/namespaces/kube-system/services/kube-dns:dns/proxy
kubernetes-dashboard is running at https://35.187.236.207/api/v1/namespaces/kube-system/services/https:kubernetes-dashboard:/proxy
To further debug and diagnose cluster problems, use 'kubectl cluster-info dump'.
Tiếp theo bây giờ bạn tiến hành khởi tạo jenkins trên kubernetes engine như sau:
gcloud compute images create jenkins-home-image --source-uri https://storage.googleapis.com/solutions-public-assets/jenkins-cd/jenkins-home-v3.tar.gzTiếp theo bạn tạo đĩa từ image khởi tạo jenkins để gắn váo kubernetes engine như sau:
gcloud compute disks create jenkins-home --image jenkins-home-image --zone asia-southeast1-cTiếp theo bạn tiến hành khởi tạo cụm cho jenkins chạy trên kubernetes engine như sau:
kubectl create ns jenkinsTiếp theo bạn cấu hình cho jenkins bằng cách mỏ source code download từ Git bước trên và trỏ đến thư mục jenkins/k8s/options rồi mở file này ra thay thế “CHANGE_ME” bằng 1 mật mã nào đó và ghi nhớ nó để login vào jenkins cấu hình sau khi khi cài đặc thành công, giả sử bạn đã thay đổi ok thì sau đó làm như sau:
kubectl create secret generic jenkins --from-file=jenkins/k8s/options --namespace=jenkinsTiếp theo cấp quyền admin trên cluster cho Jenkins thao tác bằng quyền login vào GCP như sau:
kubectl create clusterrolebinding cluster-admin-binding --clusterrole=cluster-admin --user=$(gcloud config get-value account)Tiếp theo khởi tạo Jenkin build trên kubernetes engine như sau:
kubectl apply -f jenkins/k8s/lưu ý nhở trỏ đến thư mục gốc của source code
Tiếp theo bạn kiểm tra xem hệ thống build jenkins trong cụm chạy thế nào dùng lệnh:
kubectl get pods --namespace jenkinsTiếp theo tiến hành ssl cho jenkins làm như sau:
openssl req -x509 -nodes -days 365 -newkey rsa:2048 -keyout /tmp/tls.key -out /tmp/tls.crt -subj "/CN=jenkins/O=jenkins"Tiếp theo tạo secret cho jenkins làm như sau:
kubectl create secret generic tls --from-file=/tmp/tls.crt --from-file=/tmp/tls.key --namespace jenkinsTiếp theo khởi tạo load balancing cho jenkins làm như sau
kubectl apply -f jenkins/k8s/lb/ingress.yamlTiếp theo tiến hành kiểm tra load balancing cho jenkins làm như sau:
kubectl get ingress --namespace jenkinsKết quả hiển thị như sau:
NAME HOSTS ADDRESS PORTS AGE
jenkins * 130.211.25.170 80, 443 10m
Tiếp theo lấy thông tin toàn bộ cụm Jenkins sau khi build hoàn thành như sau
kubectl describe ingress jenkins --namespace jenkinsHiển thụ result như sau:
Name: jenkins
Namespace: jenkins
Address: 130.211.25.170
Default backend: jenkins-ui:8080 (10.32.1.6:8080)
TLS:
tls terminates
Rules:
Host Path Backends
---- ---- --------
* * jenkins-ui:8080 (10.32.1.6:8080)
Annotations:
https-forwarding-rule: k8s-fws-jenkins-jenkins--168181f63bd474f0
https-target-proxy: k8s-tps-jenkins-jenkins--168181f63bd474f0
ssl-cert: k8s-ssl-jenkins-jenkins--168181f63bd474f0
static-ip: k8s-fw-jenkins-jenkins--168181f63bd474f0
url-map: k8s-um-jenkins-jenkins--168181f63bd474f0
forwarding-rule: k8s-fw-jenkins-jenkins--168181f63bd474f0
target-proxy: k8s-tp-jenkins-jenkins--168181f63bd474f0
backends: {"k8s-be-32763--168181f63bd474f0":"HEALTHY"}
Events:
Type Reason Age From Message
---- ------ ---- ---- -------
Normal ADD 11m loadbalancer-controller jenkins/jenkins
Normal CREATE 10m loadbalancer-controller ip: 130.211.25.170
Normal Service 1m (x5 over 10m) loadbalancer-controller default backend set to jenkins-ui:32763
Tiếp theo bạn lấy IP này gõ lên trình duyệt và tiến hành mở browse để cấu hình jenkins trên web UI hình như sau
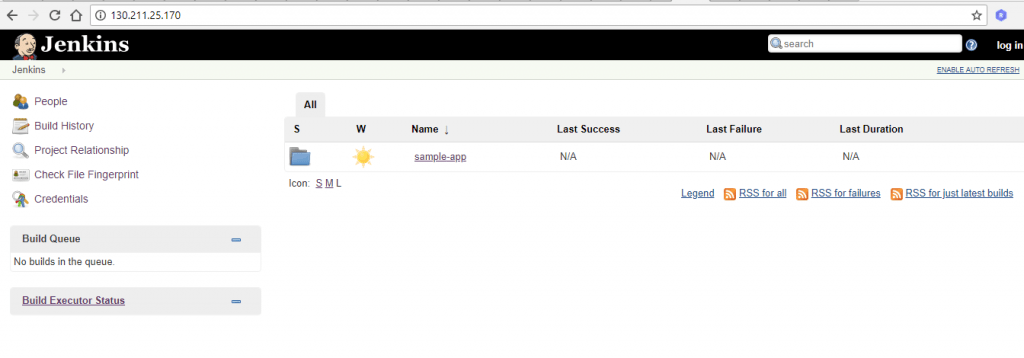
Bạn tiến hành login vào như user và pass ở bước trên khởi tạo mật khẩu cho jenkin để cấu hình
Bạn tiến hành từng bước như sau:
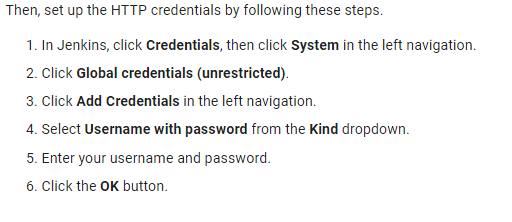
Sau đó bạn tiến hành tạo 1 job cho Jenkins chạy làm như sau:
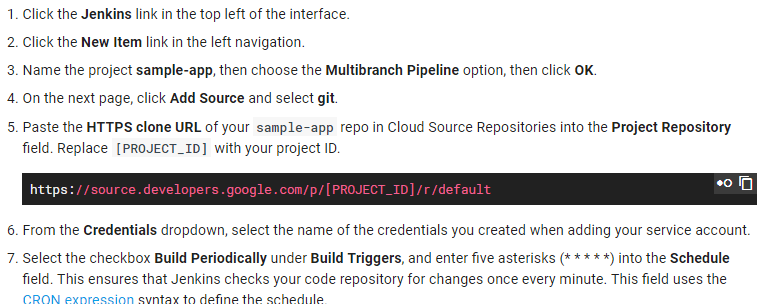
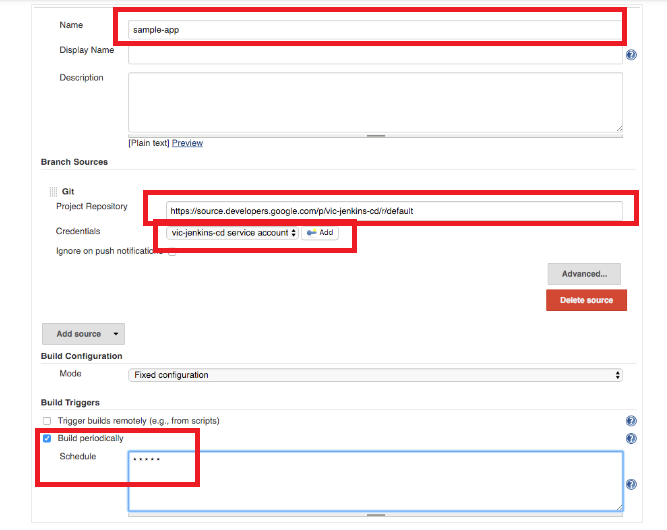
Bạn thay thế [PROJECT_ID] là tên project id của bạn trên GCP nhé
Hình thể hiện nội dung trên:
Bay giờ là lúc bạn kiểm tra hệ thống tự động build image docker và triên khai ứng dụng trên GCP qua kubernertes engine như sau:
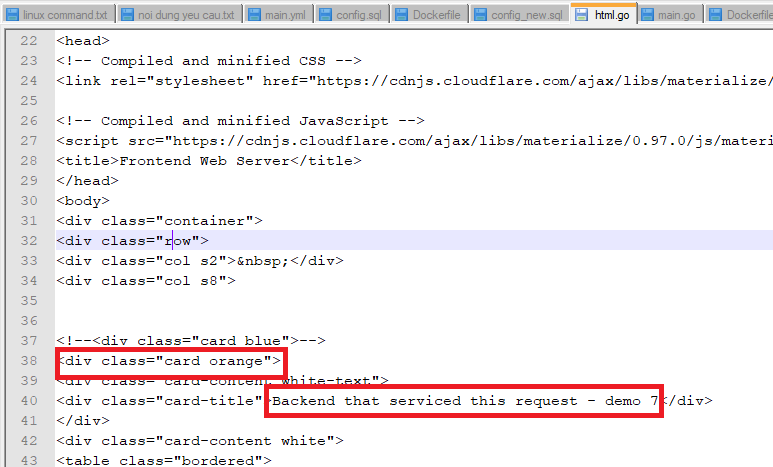
Tiến hành thay đổi source code từ bộ source code nguồn download về từ Git bước trên và đồng bộ trên source reponsitories GCP bạn mơ file code ra sửa nội dung gì đó cho các file “main.go, html.html” bạn save và Commit code lên GCP như sau:
Từ command line local bạn trỏ đến thư mục GitHubdefault chưa code như hình:
bạn tiến hành dõ lệnh:
git add .
git commit -m "Initial commit"
git push origin master
code sẻ chuyển vệ server GCP và hệ thống sẽ tự động check thông qua Jenkins và build Image , triển khai ứng dụng ngay lập tức ( có thể mất vài phút do cấu hình hệ thống test nên có thể không nhanh tức thì được )
hình mô tả:
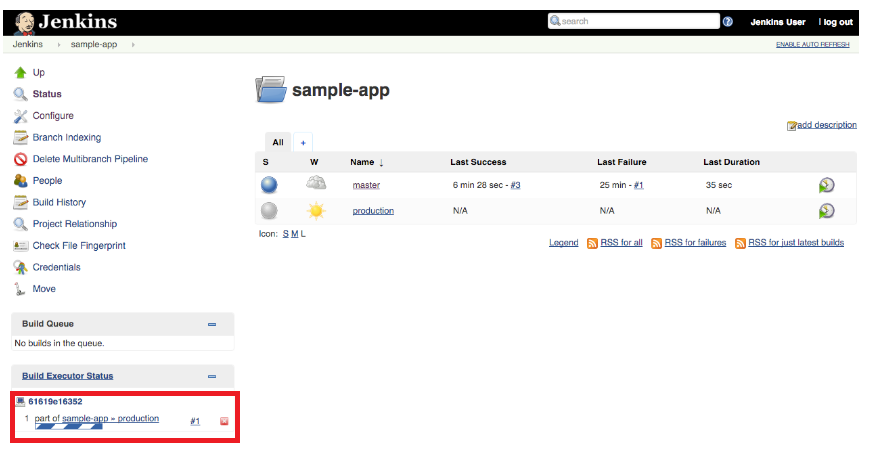
và hình chạy build lên GCP auto:
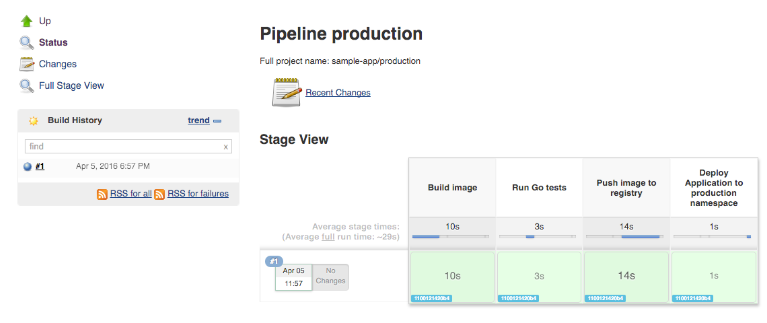
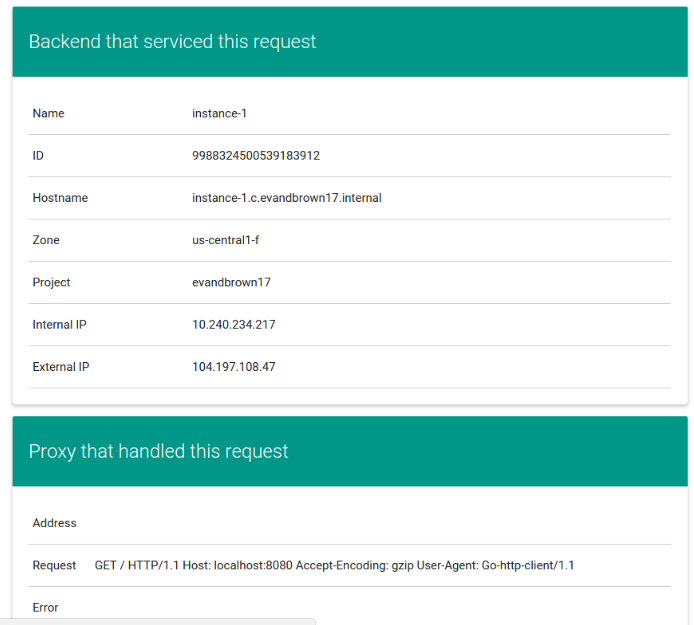
Tiến hành kiểm tra:
web trước khi thay đổi commit thì nó thế này:
Sau khi thay đổi và commit thì nó thế này
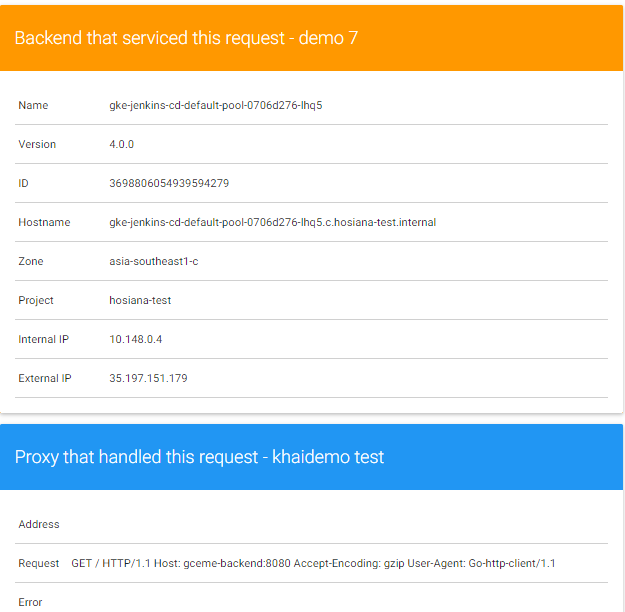
Code thay đổi và commit cho các bạn thấy tại file main.go
Đến đây bạn đã hoàn thành build hệ thống web demo qua jenkins trên kubernetes engine tự động qua pipeline CI CD.
****************het****************
thank you very much to watch it


