Link phần 1 ở đây.
Link phần 2 ở đây.
Như các bạn đã biết, ở phần 2 chúng ta phải pull image về, chạy images đó thành container, vào container cài phần mềm,… rất nhiều công đoạn phải không nào. Có một cách nữa để tự động hoá toàn bộ công đoạn đó, chính là Dockerfile. Trước tiên mình sẽ giới thiệu cho các bạn một số lệnh dùng trong Dockerfile như dưới đây.
- FROM: Là base image để chúng ta tiến hành build một image mới. Command này phải được đặt trên cùng của Dockerfile
- RUN: Sử dụng khi muốn thực thi một command trong quá trình tạo image
- COPY: Copy một file từ host machine tới docker image.
- ENV: Định nghĩa các biến môi trường
- CMD: Sử dụng khi muốn thực thi (execute) một command trong quá trình build một container mới từ docker image
- VOLUME: Cho phép truy cập / liên kết thư mục giữa các container và máy chủ (host machine)
- EXPOSE : chỉ định lắng nghe trên cổng nào đó của container
1. Tạo Dockerfile
Nào chúng ta hãy tạo một Dockerfile chứa OS là Ubuntu 16.04 sau đó cài apache server, php. Các bạn mở một thư mục mới và tạo một file tên là Dockerfile, mình dùng command line thì sẽ như dưới:
mkdir docker-blog
cd docker-blog
vi Dockerfile
Nội dung Dockerfile như bên dưới
FROM ubuntu:16.04
RUN apt-get update && apt-get install --assume-yes apt-utils
RUN apt-get install -y zip unzip php-cli php-mbstring
RUN apt-get install -y
	php7.0
	php7.0-bz2
	php7.0-cgi
	php7.0-cli
	php7.0-common
	php7.0-curl
	php7.0-dev
	php7.0-enchant
	php7.0-fpm
	php7.0-gd
	php7.0-gmp
	php7.0-imap
	php7.0-interbase
	php7.0-intl
	php7.0-json
	php7.0-ldap
	php7.0-mbstring
	php7.0-mcrypt
	php7.0-mysql
	php7.0-odbc
	php7.0-opcache
	php7.0-pgsql
	php7.0-phpdbg
	php7.0-pspell
	php7.0-readline
	php7.0-recode
	php7.0-snmp
	php7.0-sqlite3
	php7.0-sybase
	php7.0-tidy
	php7.0-xmlrpc
	php7.0-xsl
	php7.0-zip
RUN apt-get install apache2 libapache2-mod-php7.0 -y
RUN apt-get install vim -y
COPY index.php /var/www/html/
COPY run-lamp.sh /usr/sbin/
ENV LOG_STDOUT **Boolean**
ENV LOG_STDERR **Boolean**
ENV LOG_LEVEL warn
ENV ALLOW_OVERRIDE All
ENV DATE_TIMEZONE UTC
ENV TERM dumb
RUN chmod +x /usr/sbin/run-lamp.sh
RUN chown -R www-data:www-data /var/www/html
RUN mv /var/www/html/index.html /var/www/html/1.html
EXPOSE 80
CMD ["/usr/sbin/run-lamp.sh"]
Ta tạo tiếp file index.php có nội dung như bên dưới.
<?php
	function get_client_ip() {
	    $ipaddress = '';
	    if (isset($_SERVER['HTTP_CLIENT_IP']))
	        $ipaddress = $_SERVER['HTTP_CLIENT_IP'];
	    else if(isset($_SERVER['HTTP_X_FORWARDED_FOR']))
	        $ipaddress = $_SERVER['HTTP_X_FORWARDED_FOR'];
	    else if(isset($_SERVER['HTTP_X_FORWARDED']))
	        $ipaddress = $_SERVER['HTTP_X_FORWARDED'];
	    else if(isset($_SERVER['HTTP_FORWARDED_FOR']))
	        $ipaddress = $_SERVER['HTTP_FORWARDED_FOR'];
	    else if(isset($_SERVER['HTTP_FORWARDED']))
	        $ipaddress = $_SERVER['HTTP_FORWARDED'];
	    else if(isset($_SERVER['REMOTE_ADDR']))
	        $ipaddress = $_SERVER['REMOTE_ADDR'];
	    else
	        $ipaddress = 'UNKNOWN';
	    return $ipaddress;
	}
	$ipaddress = get_client_ip();
	echo ("ClientIP: ".$ipaddress);
?>
<?php
echo("ServerIP: ".$_SERVER['SERVER_ADDR']);
?>
Tạo file run-lamp.sh có nội dung như bên dưới.
#!/bin/bash
function exportBoolean {
    if [ "${!1}" = "**Boolean**" ]; then
            export ${1}=''
    else
            export ${1}='Yes.'
    fi
}
exportBoolean LOG_STDOUT
exportBoolean LOG_STDERR
if [ $LOG_STDERR ]; then
    /bin/ln -sf /dev/stderr /var/log/apache2/error.log
else
	LOG_STDERR='No.'
fi
if [ $ALLOW_OVERRIDE == 'All' ]; then
    /bin/sed -i 's/AllowOverride None/AllowOverride All/g' /etc/apache2/apache2.conf
fi
if [ $LOG_LEVEL != 'warn' ]; then
    /bin/sed -i "s/LogLevel warn/LogLevel ${LOG_LEVEL}/g" /etc/apache2/apache2.conf
fi
# enable php short tags:
/bin/sed -i "s/short_open_tag = Off/short_open_tag = On/g" /etc/php/7.0/apache2/php.ini
# stdout server info:
if [ ! $LOG_STDOUT ]; then
cat << EOB
    SERVER SETTINGS
    ---------------
    · PHP date timezone [DATE_TIMEZONE]: $DATE_TIMEZONE
EOB
else
    /bin/ln -sf /dev/stdout /var/log/apache2/access.log
fi
# Set PHP timezone
/bin/sed -i "s/;date.timezone =/date.timezone = ${DATE_TIMEZONE}/" /etc/php/7.0/apache2/php.ini
# Run Apache:
if [ $LOG_LEVEL == 'debug' ]; then
    /usr/sbin/apachectl -DFOREGROUND -k start -e debug
else
    &>/dev/null /usr/sbin/apachectl -DFOREGROUND -k start
fi
Kết quả là ta có 3 files trong cùng thư mục có cấu trúc như bên dưới.


2. Build images từ Dockerfile
Ở màn hình Terminal, trỏ tới thư mục chứa Dockerfile, ta sẽ chạy lệnh sau
docker build -t in_image .
Trong đó
in_image chính là tên image được tạo từ Dockerfile.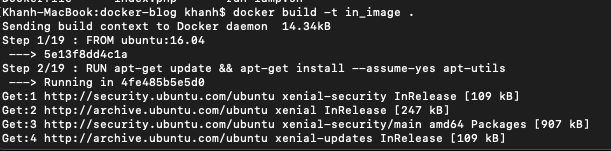
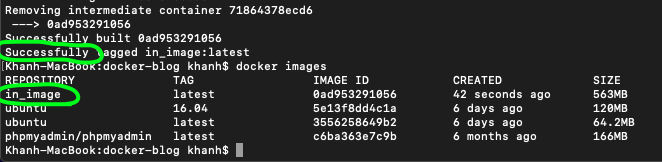
Sau khi lệnh build images bên trên chạy xong (tuỳ đường truyền mạng nhưng cũng hơi lâu, khoảng hơn 3 phút). Hãy kiểm tra xem image có tên là in_image đã được tạo ra chưa hay nhé bằng câu lệnh quen thuộc docker images (tham khảo hình dưới)
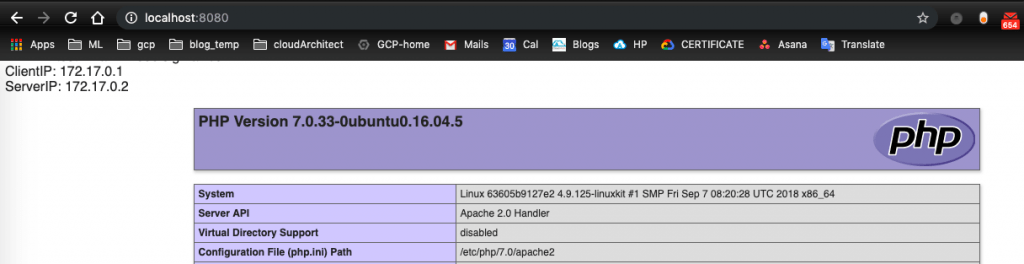
3. Chạy thử image mới vừa được tạo
Chạy thử image mới nào: docker run -i -t -p 8080:80 –name kk6 in_image Tiếp theo ta mở trình duyệt chạy localhost:8080 Kết quả hiển thị ra tương tự màn hình bên dưới phải không nào.

Khi thực hành có chỗ nào chưa hiểu, cần support, các bạn hãy liên hệ với các chuyên gia – Cloud Ace Việt Nam – , hoặc comment ở form comment bên dưới, để nhận được hỗ trợ tốt hơn.