Hi các bạn, ở bài viết trước ta đã tìm hiểu qua các cách để truyền dữ liệu trong vuejs. Hôm nay mình sẽ hướng dẫn cho các bạn về các cách còn lại nhé.
Lưu ý bài viết hôm nay sẽ hơi phức tạp, nên các bạn nên đọc qua document trước để vào phần demo trước sẽ đơn giản hơn.
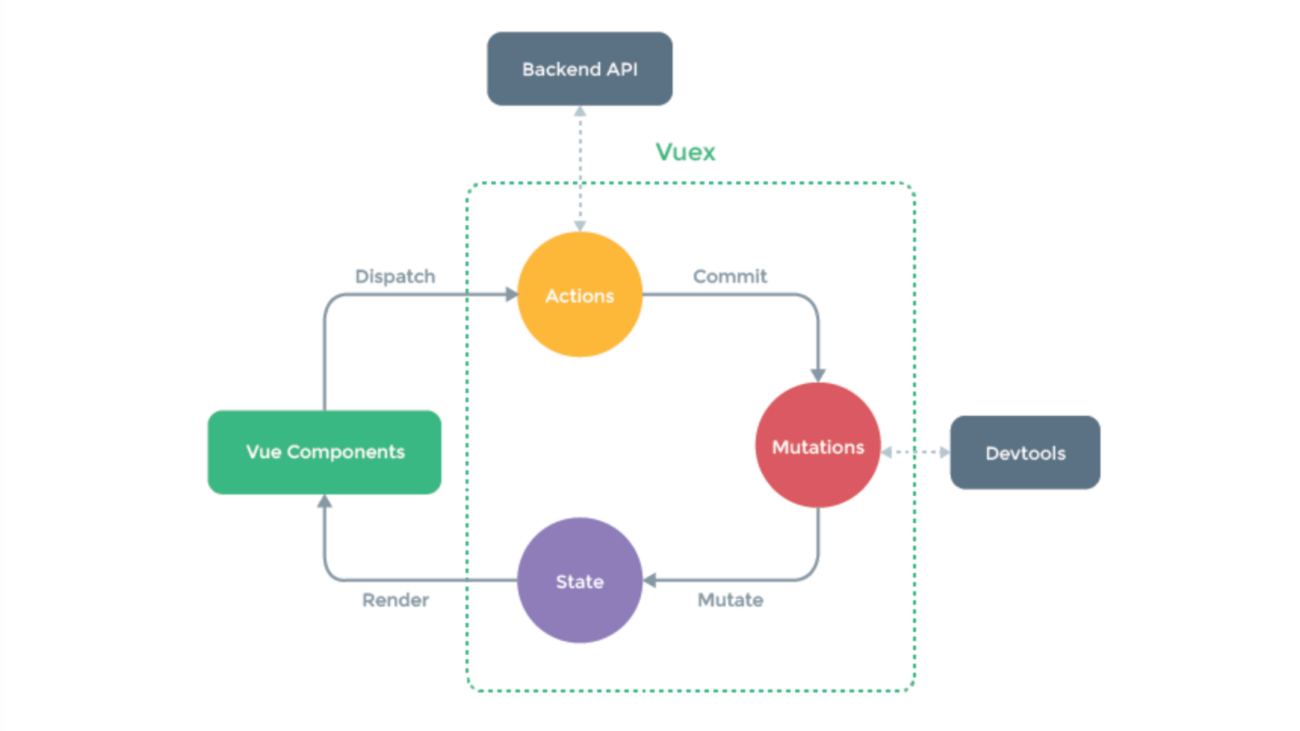
VueX:
Nếu các bạn đã từng sử dụng qua Redux ở React thì Vuex cũng tương tự như vậy, bản chất của Vuex sẽ dùng để quản lý các state, và là nơi dùng để lắng nghe và store tất cả dữ liệu của ứng dụng.

Sau đây mình sẽ làm một demo nho nhỏ để mọi người dễ hiểu hơn nhé.
Đầu tiên mình cài đặt vuex vào ứng dụng
npm install -g @vue/cli
# OR
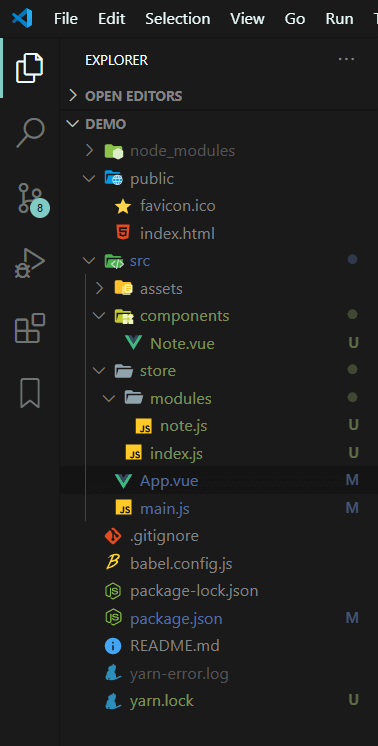
yarn global add @vue/cliSau khi cài đặt, đầu tiên mình sẽ tạo một thư mục store, ở đây mình sẽ lưu những dữ liệu mình cần quản lý vào thư mục modules
Ở file main.js mình tiến hành khai báo store vào
import Vue from 'vue'
import App from './App.vue'
import store from './store';

Vue.config.productionTip = false

new Vue({
  store,
  render: h => h(App),
}).$mount('#app')
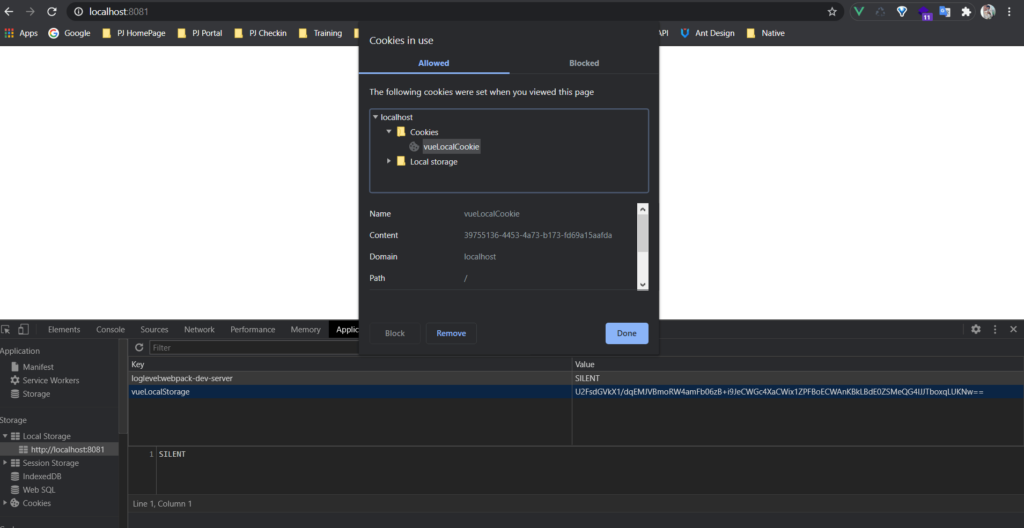
– Ở đây như thông thường chúng ta sẽ lưu dữ liệu trực tiếp nhưng ở demo này mình sẽ không lưu trực tiếp dữ liệu vào local storage hay session storage mà sẽ đi qua một vài bước trước đó.
Đầu tiên chúng ta sẽ cài đặt một số thư viện:
+ vuex-persist
+crypto-js
+ vue-cookies
+ uuid
Mục đích của việc cài đặt các thư viện này là để bảo mật dữ liệu hơn, để người dùng không thể đọc được những dữ liệu mình đã lưu ở bên dưới.
import Vue from 'vue'
import Vuex from 'vuex'
import note from './modules/note'
import VuexPersistence from 'vuex-persist'
import Crypto from 'crypto-js';
import Cookie from 'vue-cookies';
import { v4 as uuidv4 } from 'uuid';
Vue.use(Vuex)

const cookieName = 'vueLocalCookie';
const storageKey = 'vueLocalStorage';
// Lấy mã token đã mã hóa từ cookie tạo một token mới.
const encryptionToken = Cookie.get(cookieName) || uuidv4();
// Lưu trữ token đã mã hóa vào cookie.
Cookie.set(cookieName, encryptionToken, { secure: true, expires: 180 });

const vuexLocal = new VuexPersistence({
    storage: {
        getItem: () => {
            // Lấy dữ liệu từ store ở local storage.
            const store = window.localStorage.getItem(storageKey);
            if (store) {
                try {
                    // Decrypt store lấy đươc ở local storage
                    // Sử dụng encryption token stored ở cookies.
                    const bytes = Crypto.AES.decrypt(store, encryptionToken);
                    return JSON.parse(bytes.toString(Crypto.enc.Utf8));
                } catch (e) {
                    // Dữ liệu ở store sẽ bị remove nếu decryption thất bại.
                    window.localStorage.removeItem(storageKey);
                }
            }
            return null;
        },
        setItem: (key, value) => {
            // Encrypt dữ liệu ở store bằng cách sử dụng encryption token stored ở cookies
            const store = Crypto.AES.encrypt(value, encryptionToken).toString();
            // Lưu lại encrypted store vào local storage.
            return window.localStorage.setItem(storageKey, store);
        },
        removeItem: () => window.localStorage.removeItem(storageKey),
    },
});

const store = new Vuex.Store({
    modules: {note},
    plugins: [vuexLocal.plugin],
});
export default store
Ở file main.js mình tiến hành khai báo store vào
Vuex được hiện thực hóa như sau:
– Dữ liệu sẽ được truyền vào từ action có code là “this.$store.dispatch(“SET_NOTE_DATA”, this.note)” ở component
– Sau khi nhận được dữ liệu ta từ action ta sẽ lưu dữ liệu vào từ mutation
– getter sẽ là nơi ta lấy dữ liệu mong muốn
const state = {
    noteData: null
}
const getters = {
    NOTE: state => {
        return state.noteData;
    }
}
const actions = {
    SET_NOTE_DATA({ commit }, data) {
        commit('STORE_NOTE_DATA', data)
    },
}
const mutations = {
    STORE_NOTE_DATA(state, data) {
        state.noteData = data
    },
}
export default {
    namespace: true,
    state,
    getters,
    actions,
    mutations
}
Đây là dữ liệu mình đã store lại, người dùng sẽ không thể đọc trực tiếp được.
<template>
  <div id="app">
    <img alt="Vue logo" src="./assets/logo.png">
    <Note/>
  </div>
</template>

<script>
import Note from './components/Note.vue'

export default {
  name: 'App',
  components: {
    Note
  }
}
</script>

<style>
#app {
  font-family: Avenir, Helvetica, Arial, sans-serif;
  -webkit-font-smoothing: antialiased;
  -moz-osx-font-smoothing: grayscale;
  text-align: center;
  color: #2c3e50;
  margin-top: 60px;
}
</style>
Ở đây ta sẽ làm một ví dụ đơn giản. Chúng ta sẽ nhập một đoạn text cần note lại và submit dữ liệu.
Sau khi submit dữ liệu sẽ được lưu vào local storage với dạng mã hóa
<template>
    <div>
        <div>Demo Vuex</div>
        <input
            placeholder="Enter Text Here"
            v-model="note"
        />
        <div>
            <button @click="sendNote">Save Note</button>
        </div>
        <div>
            {{this.noteStore}}
        </div>
    </div>
</template>

<script>

export default {
    data() {
        return {
            note: ''
        }
    },
    computed: {
        noteStore() {
            return this.$store.getters.NOTE;
        }
    },
    methods: {
        sendNote() {
            this.$store.dispatch("SET_NOTE_DATA", this.note)
        }
    }
};
</script>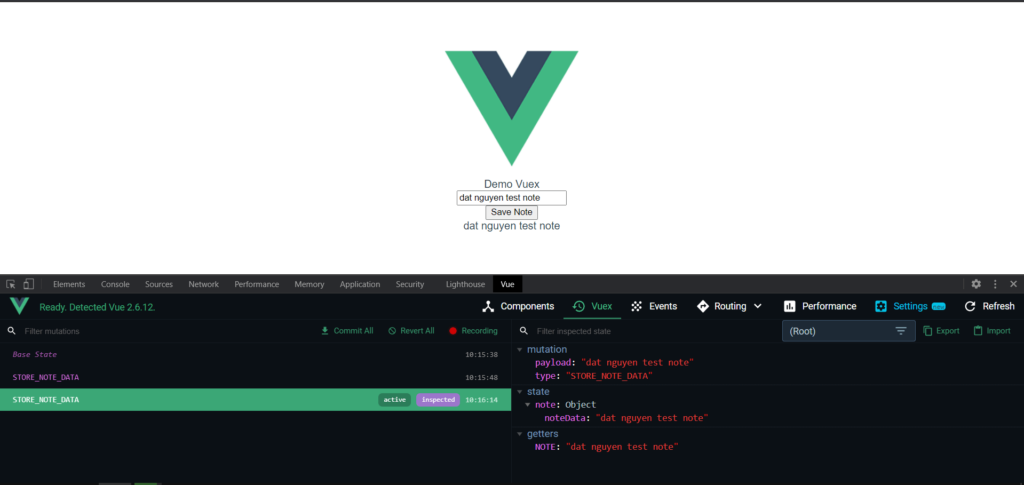
Vậy qua demo trên chúng ta nên sử dụng Vuex khi nào?
Khi ứng dụng trở nên phức tạp với nhiều commponent khác nhau, sử dụng emit và props hoặc eventbus sẽ làm ứng dụng trở nên khó quản lý hơn.
Với việc sử dụng Vuex thì nó sẽ trở nên đơn giản hơn
– Vì tất cả data đã được quản lý tập trung tại một chỗ.
– Dễ dàng quản lý dữ liệu hơn.
– Cập nhật state, data ở bất kì đâu.
Bài viết của mình đến đây là kết thúc rồi.
Ở bài viết tiếp theo mình sẽ nói về cách triển khai một ứng dụng CI/CD lên Cloud Run.
Hẹn gặp lại các bạn vào bài viết tiếp theo của mình.