Tensorflow là một thư viện mã nguồn mở do nhóm Google Drain nghiên cứu và phát triển. Sau đó được phát hành theo giấy phép mã nguồn mở Apache 2.0 vào ngày 9/11/2015. Nó được sử dụng nhiều trong xử lý trí tuệ nhân tạo – AI, machine learning,…
Tensorflow hỗ trợ CPU, GPU và đặt biệt là TPU – (Tensor Processing Unit : bộ xử lý Tensor được Google nghiên cứu và phát triển nhằm tối ưu cho việc machine learning nói riêng và xử lý trí tuệ nhân tạo nói chung. Nền tảng Google Cloud Platform đã hỗ trợ đầy đủ cho Tensorflow với cả CPU, GPU và TPU.
Tensorflow hỗ trợ cho cả PC và mobile, đồng thời nó hỗ trợ một số ngôn ngữ lập trình như ở bên dưới:
Tiếp theo bài Hướng dẫn cài đặt Tensorflow với Python trên Window OS. Nay mình tiếp tục với cài đặt Tensorflow với ngôn ngữ lập trình là Java trên Window OS.
Java
Không giống như Python, đối với ngôn ngữ lập trình Java thì Tensorflow ở thời điểm viết blog không hỗ trợ cho phiên bản Tensorflow 2.x mà chỉ hỗ chỉ hỗ trợ 1.x. Phiên bản Tensorflow hỗ trợ mới nhất cho Java vào thời điểm viết blog là 1.15.0.
https://mvnrepository.com/artifact/org.tensorflow/tensorflow
Đối với Java thì mình sẽ download các gói .jar của Tensorflow về và thêm chúng vào classpath. Để đơn giản thì ở đây mình trình bày
- Download thư viện và sử dụng chúng với công cụ lập trình IDE với tool là Maven
- Download thư viện và sử dung chung ở Command Line.
I. IDE
Đối với Java thì mình sẽ sử dụng IDE như Eclipse, IntelIj,…. với project Maven. Thêm đoạn dependency vào file pom.xml của project đang muốn sử dụng Tensorfow.
Maven
<dependency>
  <groupId>org.tensorflow</groupId>
  <artifactId>tensorflow</artifactId>
  <version>1.15.0</version>
</dependency>
<!--neu muon su dung GPU thi depend them doan ben duoi-->
<dependency>
  <groupId>org.tensorflow</groupId>
  <artifactId>libtensorflow_jni_gpu</artifactId>
  <version>1.15.0</version>
</dependency>
Mình thử tạo file có tên là HelloTensorFlow.java với nội dung như bên dưới vào Run nó nhé.
import org.tensorflow.Graph;
import org.tensorflow.Session;
import org.tensorflow.Tensor;
import org.tensorflow.TensorFlow;

public class HelloTensorFlow {
  public static void main(String[] args) throws Exception {
    try (Graph g = new Graph()) {
      final String value = "Hello from " + TensorFlow.version();

      // Construct the computation graph with a single operation, a constant
      // named "MyConst" with a value "value".
      try (Tensor t = Tensor.create(value.getBytes("UTF-8"))) {
        // The Java API doesn't yet include convenience functions for adding operations.
        g.opBuilder("Const", "MyConst").setAttr("dtype", t.dataType()).setAttr("value", t).build();
      }

      // Execute the "MyConst" operation in a Session.
      try (Session s = new Session(g);
          // Generally, there may be multiple output tensors,
          // all of them must be closed to prevent resource leaks.
          Tensor output = s.runner().fetch("MyConst").run().get(0)) {
        System.out.println(new String(output.bytesValue(), "UTF-8"));
      }
    }
  }
}
II. Command Line
Nếu bạn muốn sử dụng Command Line để Build code và Run từ command line thì:
- Cần download libtensorflow.jar
- Cần download Java Native Interface (JNI) với link như bên dưới.
| JNI version | URL |
| Windows CPU only | https://storage.googleapis.com/tensorflow/libtensorflow/libtensorflow_jni-cpu-windows-x86_64-1.14.0.zip |
| Windows GPU support | https://storage.googleapis.com/tensorflow/libtensorflow/libtensorflow_jni-gpu-windows-x86_64-1.14.0.zip |
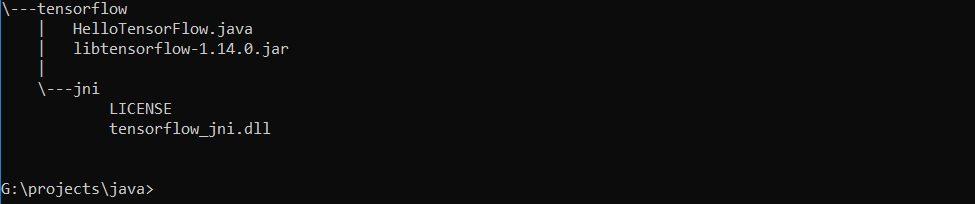
sau khi download xong mình tạo thư mục tensorflow. Sau đó, extract libtensorflow_jni-xxx.zip vào thư mục jni và đặt chúng chung với thư mục chứa source code và libtensorflow-1.14.0.jar có cấu trúc như hình bên dưới:
II.1. Compile Java Code
javac -cp libtensorflow-1.14.0.jar HelloTensorFlow.java
II.2. Run Java code
java -cp libtensorflow-1.14.0.jar;. -Djava.library.path=jni HelloTensorFlow
Nếu thực hiện mà xuất hiện lỗi như bên dưới:
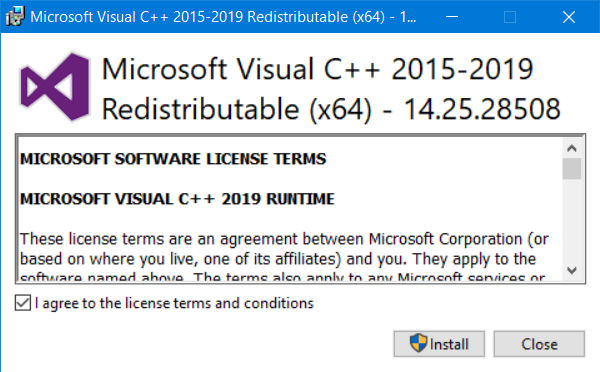
….ImportError: Could not find the DLL(s) ‘msvcp140_1.dll’. TensorFlow requires that these DLLs be installed in a directory that is named in your %PATH% environment variable. You may install these DLLs by downloading “Microsoft C++ Redistributable for Visual Studio 2015, 2017 and 2019” for your platform from this URL: https://support.microsoft.com/help/2977003/the-latest-supported-visual-c-downloads..
Thì bạn cần cài đặt thêm thư viện Microsoft Visual C++ Redistributable for Visual Studio 2015, 2017, and 2019 nữa là ok nhé.
Chúc mừng bạn đã cài đặt thành công Tensorflow trên Window OS với ngôn ngữ lập trình Java . Hy vọng với bài viết của mình, các bạn có thể dễ dàng thực hiện cài đặt Tensorflow và fix nhanh một số lỗi trong quá trình cài đặt.
Liên hệ ngay với chúng tôi, Cloud Ace để được tư vấn về G Suite, Google Cloud Platform (GCP).
Nguồn